Whatever your traditions are for this day of thanks, I hope you are able to do the things you love with those you love!
Have a very Happy Day!
I am also grateful to be able to post here today for Salt Tree's Christmas Cavalcade. It is a great opportunity to share with you and enjoy getting to know other fantastic bloggers who will contribute in the days to come!
For this occasion, I decided I needed to come up with something special, unique and exciting to share with all of you. I am so very happy to say that everything came together and I am so pleased to debut this delicious and easy to make dessert for you.
There are so many special events
and get togethers in the holiday months ahead that you really need a
supply of awesome "go to" recipes. We don't want any panic moments when you are asked to come up with
something right? Here is one that is easy to make and will
delight any guest.
This was inspired by a recipe from Martha Stewart here,
but as delicious as that sounds, time is short during the holidays, so
this is a simplified version that has unbelievable flavor and is much
easier to make.
Raspberry Cream Mousse
Ingredients:
1 pint (2 cups) heavy whipping Cream
1/4 cup powdered sugar
1 teaspoon real vanilla
3 oz. softened cream cheese (not pictured)
1/2 cup Welch's Natural Raspberry Spread
1 Tablespoon Raspberry Jello powder
12 Mother's Iced Lemonade Cookies (Or lemon Oreo size cookies)
Mint leaves and Fresh Raspberries for garnish
Whip heavy whipping cream in a mixer until it forms semi stiff peaks. Add powdered sugar until well blended. Remove 1/2 of the cream and place in another bowl. Add softened cream cheese to the whip cream (that is still in the mixer bowl) and mix until cream cheese is blended throughout.
In the other bowl, add the Raspberry Spread to the whip cream by gently folding it in until it is all incorporated. Sprinkle jello powder on top and also fold in well. (The jello will be grainy at first but in just a few minutes it will dissolve).
Place one Mother's lemonade cookie in each cup of a mini cheesecake pan. I love my pan and if you want one you can find them here or here. My pan is the bright aluminum type and so it reacted with the acid in the raspberry spread and turned a little bit blueish. If you are planning to make this a lot buy one that has the non stick coating to prevent this. I just lined the outside of the cups with parchment paper and that also helped them come out of the pan much easier.
Spread it out evenly with the back of a spoon. Then repeat with the raspberry mixture.
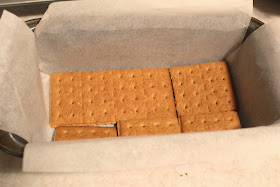
If you do not have a mini cheesecake pan, you can line an 8 x 8 pan with parchment paper leaving enough so that it hangs over the side by a couple of inches and line the bottom with graham crackers instead of the cookies. I used a bread pan for the extra mousse and that works too. Layer the whip cream mixture first and the raspberry mix last.
Then cover with plastic wrap and chill for about 2 hours.
Remove from pan and carefully take the parchment paper off of the sides. Then use a spatula if needed to even the sides up.
This recipe was shared with these great sites:
A to Z Celebrations
The Recipe Critic
Naptime Creations
Kitchen Meets Girl
Smart School House
Mommifried
My Personal Accent
The Country Cook
Kitchen Fun with My Three Sons


challenge excepted :) looks really good. i will have to try this!
ReplyDeleteThanks for looking Chef Hallie! I want to see what you have been up to!
DeleteYour raspberry cream mousse look gorgeous! Thanks for the recipe!
ReplyDeleteHope it works out for you too. It is a fun treat to take to parties at Christmas Time!
DeleteThanks so much! It was fun to make them. I visited your site and it is wonderful!
ReplyDeleteSandra, these are so pretty and look delicious! They will definitely find a place on my Christmas Eve buffet table. Thanks you so much for posting this amended version of the recipe. Can't wait to try these.
ReplyDeleteLinda
mysewwhatblog.blogspot.com
I hope you love them like I do! They really are very fast to make up!
DeleteWOW! What a eye catcher! I love the recipe and the tutorial, thank you for sharing it on our Four Seasons Blog Hop. Pinning now.
ReplyDeleteThanks Shawna! Love to be pinned!
Delete