When you find out how easy these really are to make you will be amazed and delighted! I have tried a few petit four recipes in my time and none were what I would call fast or easy. With all purchased ingredients they come together in minutes (except for the chilling time) and after resting overnight they taste like you slaved all day making and cutting tiny cakes to dip in white frosting. This recipe is adapted from Snackworks.com.
First, I will apologized for the recipe amounts. The amounts are close to what is needed but vary a little with how much you leave on and in the middle of the cakes. I just kept dipping and adding jam and chocolate until they were all finished. This is how I did it.
Valentine Petit Fours -Cheater Style!!
1 Box Vanilla Wafers (I used Nilla)
24 oz. White Almond Bark (White Chocolate would be even better!)
1/2 cup Raspberry Jam or Cake Filling
Valentine Decorating Hearts and Sprinkles
Decide whether you want to make double layer or triple layer cakes or a combination of each. Count out the number of bottom layers you can make and set them on a wax paper lined cookie sheet flat side down.
Add a small amount of raspberry jam (I used cake filling I had on hand) to the flat side of each remaining wafer and set one or two (dbl or triple) on top of the cookies that are on the cookie sheet. I did like the doubles because they were easier to eat.
Set the cookie sheet in the fridge for 4 to 6 hours to chill until firm enough to dip. I actually put mine in the freezer for a half hour and they were fine. As they warmed up the last few started to slide so you may want to only take a few out at a time to dip.
Melt the Almond Bark as the directions direct. Please watch carefully to make sure you don't get it too hot. Stop heating as soon as or even a little before the chunks are completely melted. Then stir until smooth. Set the cookies on a fork and lower into the Almond Bark until fully covered. Lift them out and tap gently on the side of the cup to loosen the extra candy off, then swipe the bottom of the fork across the cup and set the cake on the wax paper to set up. After every other one is dipped, add your sprinkles or decorations before the candy sets up.


I was disappointed when I tried one of these right after they set up because they were so crunchy and hard to cut and eat. I took them to the other aides I work with at school the next day ready to tell them they were not that great. As I ate one I was so happy to see that letting them sit overnight had softened the inside to a cake consistency and they were delicious! The filling was fun too. I do wish I would have added a little more filling so I will try it that way next time.
I think these would be great for not only Valentine's Day but Wedding Showers or other nice events! Have fun with these and Please!!! drop a note or a picture if you try these and let me know how you liked them! Thanks for dropping by!
This post was shared with these great sites!
Wednesday Roundup
Wonderful Wednesday Blog Hop
A Dish of Daily Life
The Country Cook
Pretty Pintastic Party
Inspire Me Monday
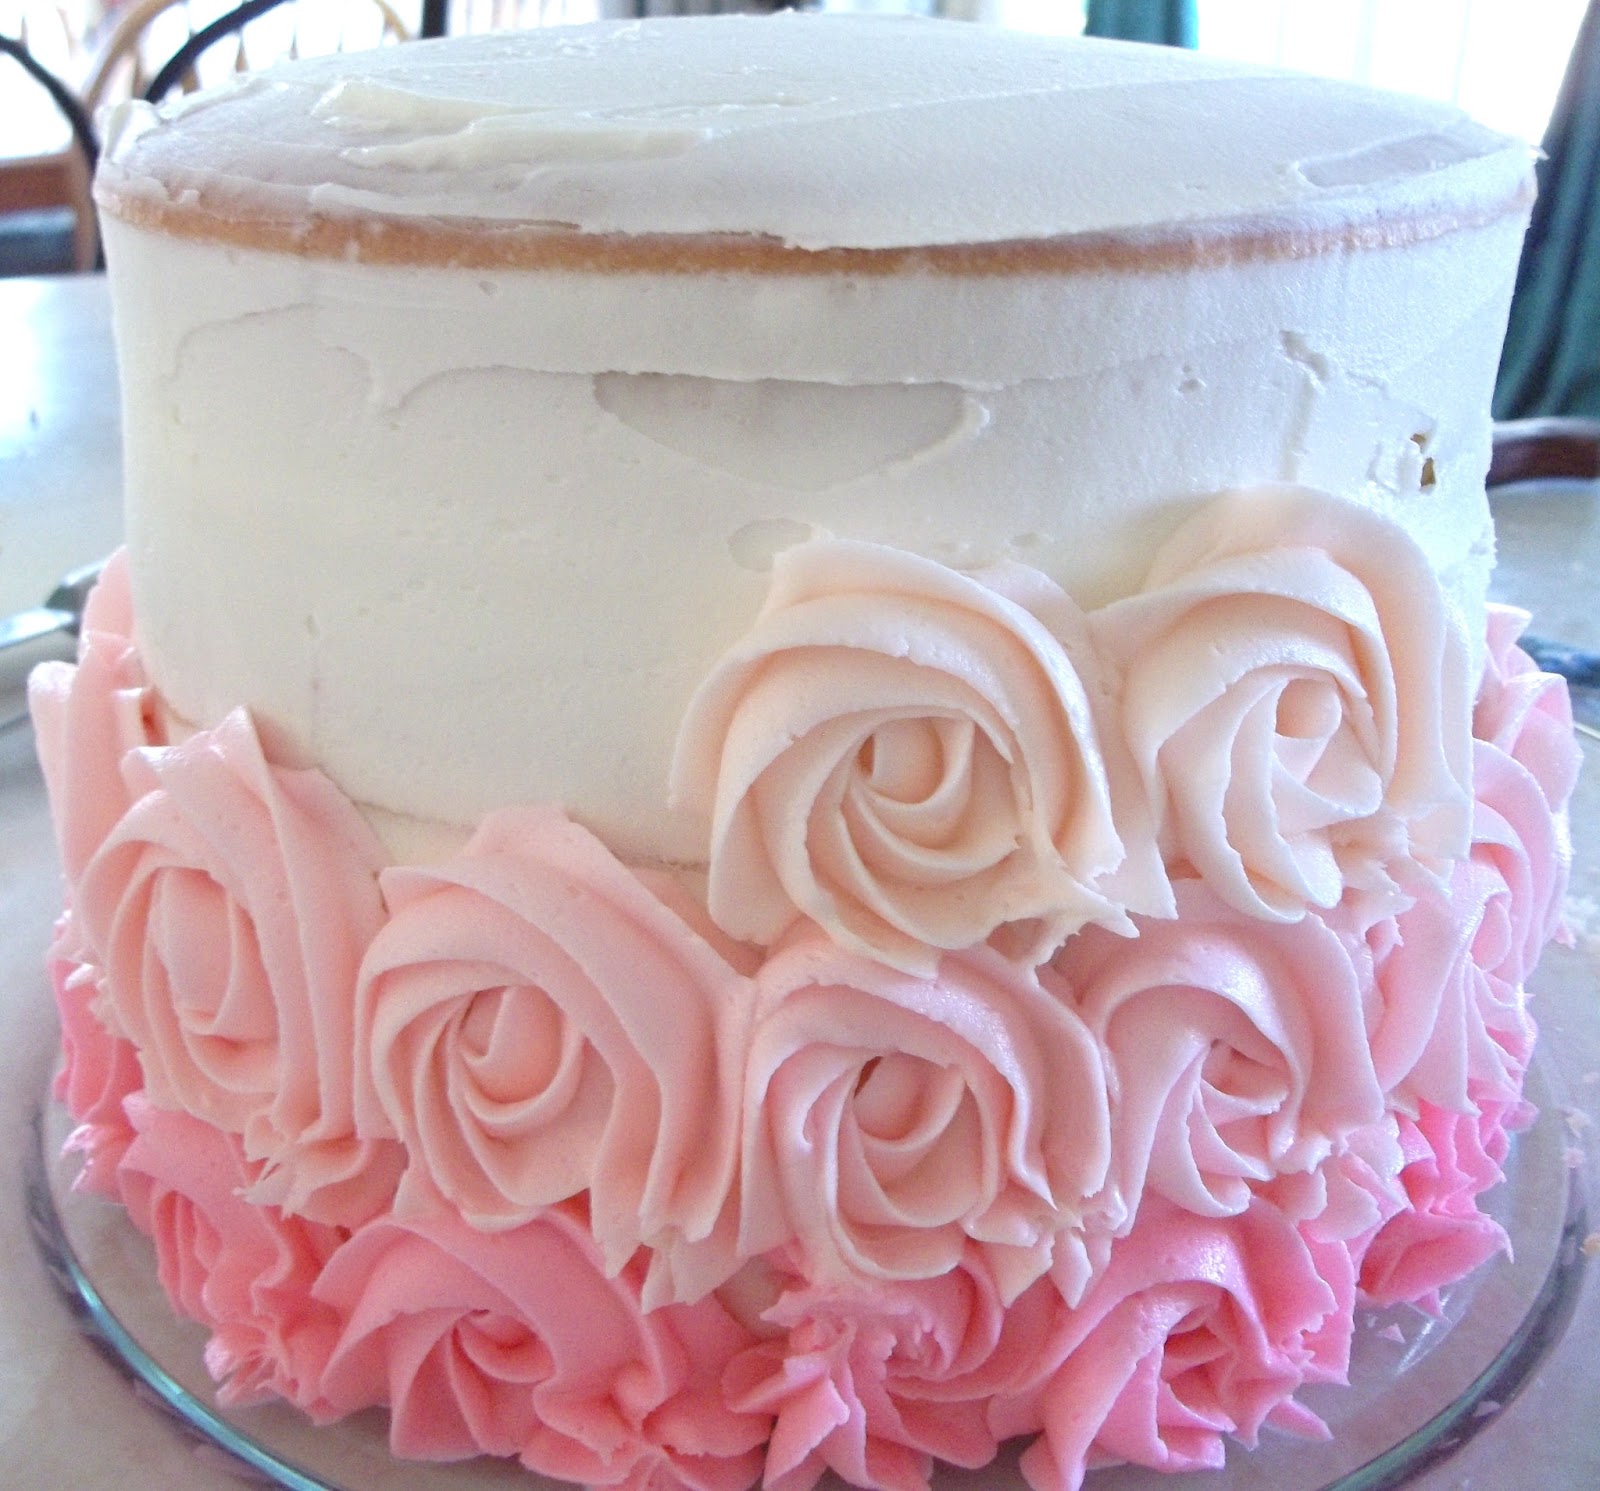
Day 2: Cut & Fill, Crumb Coat
Today you will be using icing to fill the cake and also to crumb coat the cake. If you have never done a crumb coat, it is a thin layer of icing put on the cake and allowed to set so that any stray crumbs will stick to that layer of icing and not get into you final and perfect icing layer. Since this is a tutorial using buttercream icing, it is important to use a buttercream that will crust. That means that after about 15 minutes of sitting after it is applied to the cake it will not be sticky anymore. It will become a little dry on the very top so that you can smooth it and make it look very close to a fondant finish. I really like this tutorial by Glorious Treats. Her method is simple and easy to follow so I will give you the link here: American Butter Cream.
The only change I make is to substitute High Ratio Shortening for at least 1/2 of the butter. Butter is delicious and wonderful for most cakes but it doesn't hold up well when you are stacking cakes and want a firm frosting. High Ratio Shortening can be found at most Bakery Supply stores. It really is a must to make really creamy icing with good mouth feel. Crisco isn't the same as High Ratio either. You can get it from Amazon in a pinch here High Ratio Shortening. But it is much more expensive than if you get it locally.
Using this shortening also helps you keep you icing whiter than with butter. I still use 1/4 to 1/2 of the recipe with butter because the flavor is so much better. I still need to experiment more with colorless butter flavor to see if it will improve the flavor of using all shortening for a really white icing. When I used butter in my icing I also used Wilton's "white white" coloring to improve the whiteness of the icing. Find it in a craft store or here Wilton's White White.
Make your icing now following the instructions with the least amount of milk. You will want the icing stiff to make a dam for the filling and then you can add more milk to make the icing thin to do your crumb coat. The amount of icing you need for this step will of course vary depending on the size of your layers. I found that 2 recipes of icing made a dam for the 10" and 12" centers and also made a thinned layer for the crumb coat for both filled layers with 1/2 left over. Be sure to cover the icing bowl with a damp towel while you prepare your cake. The icing will stay nice and creamy with the moist air from the towel and will not dry out and become crusty.
After cakes have set in the fridge overnight they will be cold, firm, and easier to work with. Take cake layers out of the fridge. Prepare one cardboard cake round to go under each layer. It should be a couple of inches larger than the cake layer at this point. We will cut it later to exactly fit the cake. To do this, add a layer of wax paper to the round either using double stick tape or a thin layer of hot glue to the cardboard. Stick the wax paper to the board and then cut it to the exact size of the cardboard. To see how this is done look here. This helps keep the board from absorbing moisture from the cake and icing.
Remove the plastic wrap layers, (I save mine to wrap them with after the crumb coat) and set the cake layer on the cake circle. To make sure the cake stays in place, first put some icing on the cake round and then set the cake on that. Now place the cake layer on your turntable (also use some icing underneath the cardboard to hold it on if it doesn't feel secure). Mine has a rubber surface that holds pretty well or you can also add some rubber nonstick rug mesh to hold it in place.
If your cake top is rounded, you will need to level it by cutting the rounded part off. Hopefully if you have followed the steps in Day 1 your cake will be quite flat on top.
If you plan to use a filling in your cake, you need to cut the layers in half horizontally. This may seem a little scary at first but if you use this method and have a serrated knife with a long blade on it, it is pretty easy. First, take some toothpicks and mark halfway up the side of the cake at intervals around the cake like this:
I pretty much eyeball this and when they are all in place I change any that look out of place.
Then I use my long bladed knife to begin cutting.
As you put pressure on the knife to cut, turn the table and slowly inch towards the center. Turning the table as you go will let you keep the knife level and even. When you reach the center, you can feel the cake top release and you're done!
Now you can use a metal lifter like this one or even another cake circle to lift the top off and move it to the side to allow you to fill the cake.
Now you are ready to fill your cake. With medium stiff icing in a piping bag and a large tip (I used a #21 (starish looking one) for the lemon filling but changed to a #303 round for the last layer and liked it better. Pipe a 5/8 dam around the edge of the layer. If the icing breaks go ahead and push the icing together until it seals together to form a complete circle.
On this second layer, I came in about 1/4 inch to give the icing room to spread a little when the top is put on.
Now fill the center with cake filling. I made the lemon with the recipe on the Wilton site which is quite easy to make and delicious. The raspberry filling I used on the other layer was some I purchased from my local bakery store called Baker's Cash and Carry. It was nice not to have to worry about making the filling when timing is important.
 Now replace the top layer.
Take your remaining icing and add milk or cream to make it a thin consistency. With an offset spatula, ice your cake with a thin layer all around the sides and then on the top. Let this coat sit for about 15 minutes to crust and then wrap it again in the plastic wrap the same as before and place it in the fridge overnight. See you tomorrow for Day #3!
So you have seen these cakes all over on pinterest right? Have you been just a little afraid to try? That's how I felt. I wasn't sure how they did it. Wasn't sure mine would turn out. But I needed an idea for my mom's 83rd birthday cake and I needed one fast. I mean fast and fast to make. I was helping make other food items for our family 4th of July dinner and so it couldn't take a long time and intense work. I guess I have a devil may care attitude or something so I decided to try it. After all I do have about 79 cake mixes in my food storage so if it failed I could just whip one out and make a good ole 13 x 9 pan cake and ice it with store frosting (also in food storage, I am a food storageaholic!) couldn't I? It was soooo fun! And it came together fast and easy. You do have to make sure you have the icing tip and a few bags for the different colors and 8" or 9" round pans. Here's how it went:
I found instructions to make this one on this site: Country Cleaver . I really like her pictures and explanations so you can look there for more info. There are a few changes that I made to her process. First, I started out with making a double WASC cake recipe. This starts with a box mix and adds ingredients to make it moist and delicious. If you don't have it let me know but any cake will work.
I found my mom's 8" cake pans that I (honest mom) didn't remember I had them in the bottom of my oven storage drawer. (She's been looking for them for years...). Divide the batter into 4 parts in separate bowls. I used Americolor 132 Soft Pink to make the shades of pink in the icing and cake batter. Americolor is very strong so use it very sparingly. My first try to make the lightest color actually turned into my darkest pink with very little color added. The color also intensifies after sitting for an hour or so.
I used my pan release on the pans- found here,
(it is great stuff!) then I poured batter in the pans until it was about 1/2 way full. Use Bake Strips found here (you can get them at Micheal's or Jo Ann's too) to help them bake with a less rounded top.
Check cakes with a toothpick to check to see if they are done. The WASC recipe takes a little longer than regular mixes because it is more moist and dense.
Cool cakes about 10 minutes and then take out to cool completely on a wire rack. Meanwhile, make your icing. I liked the white chocolate icing Country Cleaver used but didn't have the ingredients on hand so I just tripled my recipe for American Buttercream. I have more experience with it too so I knew it would work well. Next time I would 4x it because I had to really scrape the bowl to have enough to finish my last rose on top! Divide and color! Try to match the cake levels of color.
American Buttercream Icing
1 cup butter (salted) ( I used 1/2 cup butter and 1/2 cup vegetable shortening to help stabilize it.
It also keeps the icing white so when you add food
coloring it will be the true color you want.)
4 cups powdered sugar
1/2 teaspoon clear vanilla extract
1/2 teaspoon clear almond extract
2 Tablespoons milk
Cream butter in bowl for 1 to 2 minutes. Add 1/2 of the powdered sugar slowly and beating thoroughly after each addition.
Add flavorings and half of the milk. Add the remaining powdered sugar and beat until creamy. Add the rest of the milk as needed for the consistency you want.
This is a crusting buttercream so keep it covered with a wet cloth until you use it.
To assemble and ice:
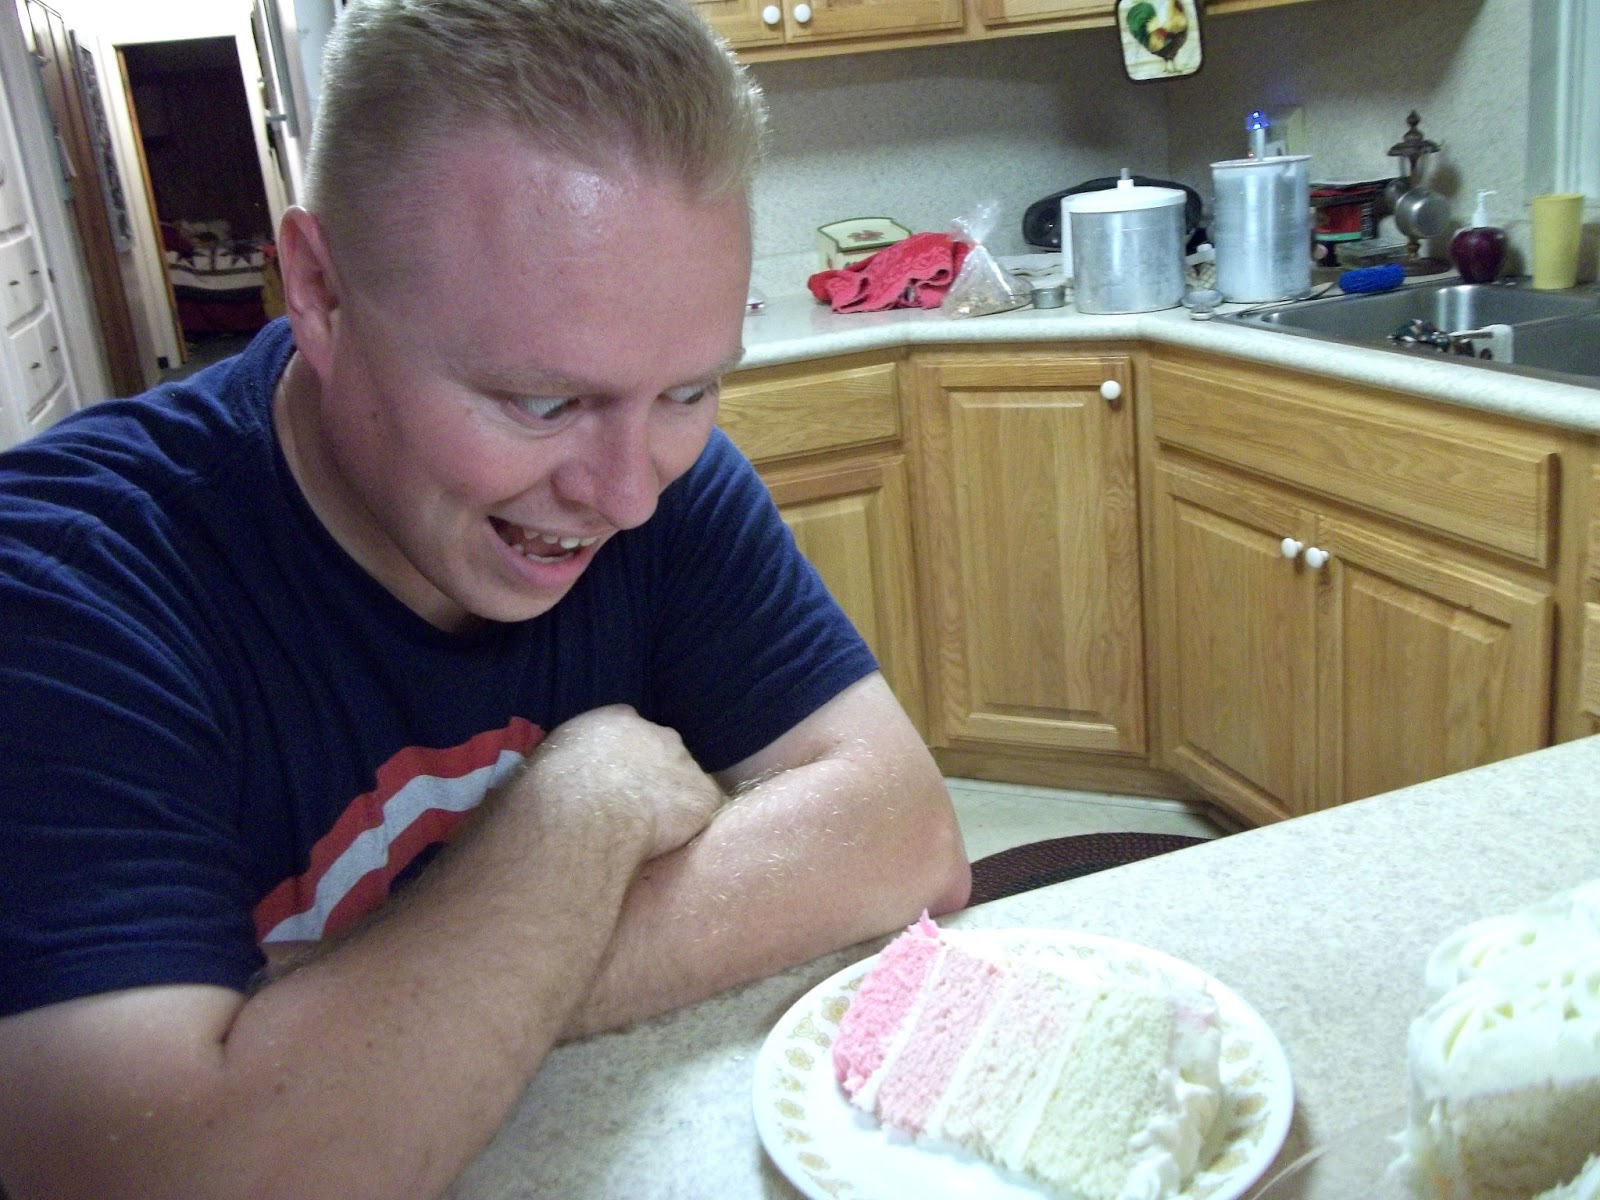
Once cake layers are cool, take a long knife and level the tops to make a flat surface on 3 of them. Place darkest layer on serving plate. Ice top with plain colored buttercream. Place the next darkest layer cut top side down on the icing and ice the top of it. Place the next and lightest pink layer on top, cut side down (this reduces the amount of crumbs you will have to deal with). Ice it and place the last (non colored) layer on top with the dome facing up. Ice the entire cake with a thin layer of white icing.
I didn't use an icing tip for this because honestly it was faster and easier to just use a offset spatula to apply and quickly smooth the icing around the cake. This icing layer only needs to be quite thin as a background for the icing to come. The rose circles will add plenty of icing for the cake.
If you are lucky enough to have 4 1M icing tips and 4 size 14 bags or larger you can now fill each with a different color of icing and you are ready to go. I am not that lucky so I had to do mine one at a time.
Start with the darkest pink and (this is the fun part!!) make a rose at the bottom of the cake. All you do is hold the bag at a 90 degree angle (straight out) from the cake. It is like making the letter O from the bottom and up and around it. Start your O in the center, while pressing icing out, continue to the bottom of the O up the left side and around to the right side and then the bottom where you stop pressing.

Moving to your left around the O automatically makes it look like a rose. See? Easy peasy! And you will look at it and be amazed that it looks so pretty! Remember to make the 1st rose and each one after it as tall as the 1st layer of cake. Using the layer as a guide helps it to come out even. Also, as you start the subsequent rows of roses keep each one right above the one under it so the vertical rows will be even and pretty to look at too. This part goes very fast. The top is just more of the same but start on the outside circle of the top and work in to the last rose in the middle with the lightest color. There you did it! Congratulations!
In case you are wondering about this picture, it is my silly nephew, Blake. You might not believe that he is actually a well respected teacher and community member! He just has this SILLY side that has to come out! Also, he was very excited about this cake!
Have FUN!
Here is my cute mom! I think she liked it!
This recipe has been shared on the following wonderful sites!
Mandy's Recipe Box
The recipe critic
anyonitasnibbles
Chef in Training
kitchen fun with my 3 sons
The Country Cook
Chocolate Chocolate and More
What's on the List
I have to apologize for leaving you for so long! I know it was not great but...I do have an explanation. I was asked to make a wedding cake about a month ago and need I say more?
I am far from being an accomplished wedding cake maker but it has been a dream of mine for, well, about my whole life. I bought pans, looked at sensational pictures and dreamed of the day when I would be good enough to make one like "that". Well, the day came and I still wasn't prepared. But I looked at the pictures of some simple cakes and thought "How hard could it be?" I was about to find out....
I wasn't concerned about finding a wonderful cake recipe because I have one that I have used many times on large one layer cakes. It turns out beauuutifully. Then I was told that due some manufacturer changes in ingredients that my recipe was failing. And I was told that by some pretty wonderful accomplished wedding cake makers. Oh dear! So I spent a few sleepless nights wondering what to do. And with some help from my niece, Hil and her sister who makes cakes a lot it all worked out.
There is a lot of good advice out there on the web and I believe I probably read about 13 million hours (I never exaggerate!) of it just to be sure that I was ready for any possibility. You just can't take chances on someone's wonderful, most special day in the world can you? It was a fun, nerve wracking, tiring, exciting and beautiful time all in one. In the end I was just super relieved and proud that it all came together (and also that I didn't drop it or trip with it.) Here are some of the highlights in pictures of the process.
If you are interested in learning from my experiences about all the steps and neat tricks I learned, please comment below and I will do a complete tutorial on making a Wedding Cake.
Here are some of pictures of the finished product!
Thanks for your patience. I will be blogging again very soon!


