Monday, April 29, 2013

Luscious Lemon Chicken Pasta


 Do you have a favorite Italian Restaurant that serves mouthwatering pasta dishes for exorbitant prices?  This pasta could easily be on their menu but making it at home is just as good and not expensive at all!  My only regret is that you can't taste this from the picture.  You know like the scratch and sniff stickers they used to have?  I wish you could smell and taste this because it is so full of flavor.  Let's get started!
 Round up the marinade ingredients:

1/2 cup oil (olive or vegetable)
2 Tablespoons minced garlic
1 Tablespoon Cajun seasoning
Juice of one fresh squeezed lemon (1-2 Tblspn. bottled)
2 Tablespoons minced dried parsley
2 Tablespoons brown sugar
2 Tablespoons soy sauce
2 chicken breasts (20 oz) cut into 1" chunks

Mix marinade ingredients in a zip lock bag and then add chicken pieces.  Marinade in the refrigerator for 3 to 12 hours. 


 Prepare Sauce Ingredients in a small bowl:

2 Tablespoons oil (Olive or vegetable)
Zest from one large lemon ( make sure to use only the yellow part, the white
                                        part is very bitter)
Juice from 2 lemons (about 2 Tblspns. bottled)
1/4 cup chopped fresh parsley (I used 2 Tblspns. dried)
salt and pepper to taste


Add 3/4 lb of angel hair pasta or linguine to boiling water and cook 7 to 10 minutes until done.   Add marinade and chicken pieces to a large skillet and cook on medium high until chicken is white and cooked through. Season with salt and pepper to taste.  Drain cooked pasta and put in a large bowl.  Add lemon juice parsley mixture to pasta tossing gently until well blended. 

Add Chicken from skillet to pasta and toss till combined.  Sprinkle with Parmesan Cheese.  Serve immediately.  Yield 6 servings


This recipe was adapted from a wonderful cook, Mel from Mel's Kitchen Cafe and you can visit her blog here.  This recipe was seen on Mandy's Recipe Box,Jam Hands,Make ahead Meals for Busy Moms,The Recipe Critic, Nap Time Creations,Pint Sized Baker,

p.s. Comments are very welcome!
p.p.s. When people comment it makes my whole day happy! 
p.p.s.s. Thanks for your visit!


Monday, April 22, 2013

Samoas To Die For!!!

Heaven knows I've tasted a lot of cookies in my life.  Some I like and some I like more.  I meet very few cookies I don't like.  In fact cookie monster is a not so very distant relative of mine.  But.... I can honestly say these cookies are so good you may cry when you eat one.  They may be just a little addictive so you may want to be sure to have lots of people around in a party or something to eat them to save you from yourself.  If you like the Girl Scout version you are going to LOVE these!  


Cookie Center

1 cup Butter (softened)
1/2 cup sugar
2 cups flour
1/4 tsp. baking powder
1/2 tsp salt
2 Tblspn. Milk (optional)
1/2 tsp. Vanilla

 Begin by creaming the butter and sugar together for one to two minutes until it changes to a light color and is fluffy.

 Mix the flour, salt and baking powder in a bowl and then add it slowly to the butter mixture until well blended.  Add vanilla and then only add milk if the dough won't come together in a ball.  Mine did not need any at all.
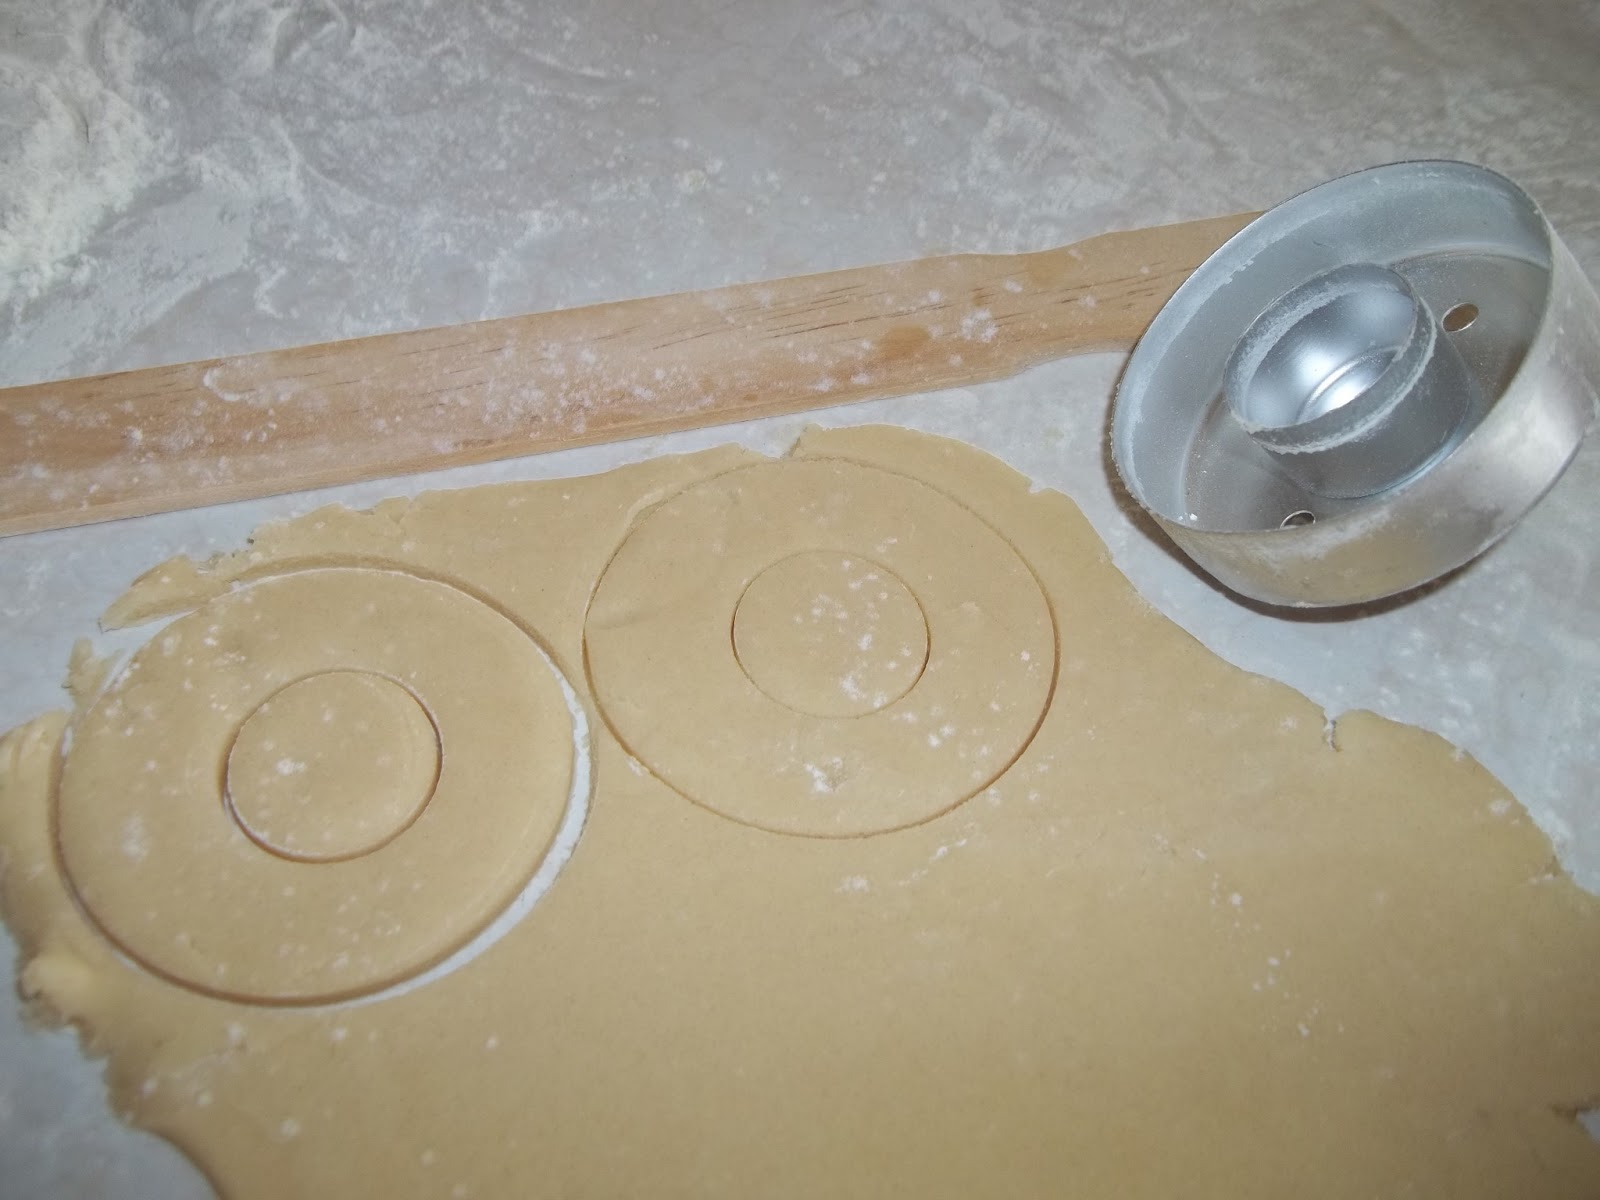
Gather dough in a ball and divide into two.  Wrap each ball in plastic wrap and chill for about an hour.  Then remove and work a little with your hands until it is pliable enough to roll out. 

 Lightly flour the counter surface and roll to about 1/8" thickness.  I like to use two new paint sticks under the rolling pin to make sure it is very even. 
 Cut out your cookies with a 1 1/2" to 2" circle and about a 1" inner circle.  Any cutters will do but it was nice to do it in one step with my doughnut cutter.

 Place them on a cookie sheet with a silpat liner or parchment paper and cook at 350 for 10 to 12 min. until the bottom of the cookies are a very light golden brown.  Cool slightly on the pan and then remove to a cooling rack to finish.

Topping

3 cups shredded sweetened coconut 
15 ounces carmel (individually wrapped store brand is fine)
1/4 tsp. salt
3 Tblspn. milk
1 1/3 to 2 1/2 cups dark chocolate chips ( I used Costco- Kirkland Brand and they were excellent!)


Preheat oven to 300 degrees.  Place coconut evenly on a parchment lined baking sheet.   Toast for 20 minutes, stirring every 5 minutes to ensure even browning.  Watch carefully because it browns quickly and could burn.  Cool on baking sheet stirring if browning continues.  Set aside.


 Place caramel in a large microwave- safe bowl with milk and salt.  Cook on high for 3-4 min. stopping  and stirring every minute to melt carmels.  When smooth, fold in coconut.  When mixture is very warm it will spread easily on the top of the cookies and it will stick to the cookies without any problem.  If it cools too much it will come off.  If this occurs, reheat the mixture in the microwave a little until it is soft and sticks well again.  Using the tip of your butter knife, take a teaspoon at a time and stick it on the top of the cookie. Moving around the circle quickly with small amounts of topping will work better than trying to push it around and spread it out. 

 Set cookies on a rack for the topping to cool and set up.  Meanwhile, place chocolate chips in a microwave safe bowl and heat in 30- 45 second increments until it is melted and smooth. 
 Holding a cookie, dip the bottom into the chocolate. Using a metal spatula scrap the extra chocolate off leaving a smooth even covering on the bottom of about 1/8" inch.  Place on a cookie sheet lined with wax paper or parchment paper.  Then when all the cookies finished place remaining chocolate into a small ziplock bag and cut a tiny corner off.  Use this to place lines of chocolate across the cookies.
 Let cookies cool until completely set.  (You can put them in the fridge to hurry this process for 15 minutes but leaving them longer may make the chocolate turn white.)  This recipe made 28-2" cookies.

 These are as wonderful as they look!  


This recipe was adapted from Just a Taste and Orson Gygi's Blog.  
It was seen on The Recipe Critic,Chef in Training,Buns in my oven and Mandy's Recipe Box.

Tuesday, April 16, 2013

Mom's Homemade Chicken Soup mmm...

     Even though spring is close by we are still having cold weather and even snow the last couple of days.   It is still a very good time for some comforting homemade soup! I have many memories of my mom making this to take to sick neighbors and family.  Every time we get a cold you can bet a pan of this will show up at our house from mom!  This really does have magical healing qualities and is so delicious!  

     This is one of the few recipes that I usually just make--no recipe needed.  I know it so well that I can just add ingredients until it looks "right".  But if you are like me in almost every other instance I have to have a recipe with real amounts or something always seems a little bit off.   So I  measured as I cooked and wrote it all down for you! 

Mom's Chicken Soup

For a 6 quart pot (8-10 servings)

Place in a pot and bring to a boil:
5 lbs. bone in chicken (I use 5 legs and 5 thighs, the dark meat has more flavor but any pieces will be fine).
2 small or 1 med. onion chopped into 1" pieces.
2 tsps. salt
Water to cover chicken 

Boil slowly for 45 min. to 1 hour.  Remove chicken to a plate to cool.  
Meanwhile, peel and slice
 3 cups carrots
 1celery rib. 

 Then peel and dice 
2 med. to large potatoes and add to boiling broth.


By this time meat should be cool enough to handle.  Remove and discard skin and bones. Pull meat apart and break into 1" - 2" pieces.  This made about 5 cups of meat.
Put meat back into pot of broth.  Let vegetables boil for about 10 minutes (the carrots add a beautiful color and flavor to this soup so don't skimp on them!) then add 1 to 2 cups large wide egg noodles and let boil for 10 minutes more.  (Mom makes her own noodles and they are fabulous but I have yet to learn the art so I buy mine!)  
Add more hot water to replace the amount that has boiled off and then a little more to make the soup the consistency (thick or thin) that you want it.  I added in all about 7 cups more water. 
Bring again to a boil.  Now you need to slowly add more salt to taste.  I added about 1 and 1/2 more tablespoons.  Add a teaspoon at a time and taste.  


To thicken soup:

In a small bowl or cup add:
1 cup cold water
1/2 cup flour (or cornstarch)
Mix with a wisk until blended.  

To avoid getting lumps in your soup, remove some of the hot juice (1/4 cup) and mix with the water and flour mixture.  Mix and then add another 1/4 cup of hot liquid. Mix and then pour all of this into the soup and stir until combined.
.  Boil for 1 minute.

The soup is finished now but you can also add dumplings if you would like.  This is my recipe that I have used for years from the Betty Crocker Cookbook.  This is sooooo much better than the box mix kind and really quite fast to make.  Pleeeease use it ok?  (I feel so much better now).

Dumplings:  


3 Tblspns. shortening  
1 1/2 cups all purpose flour 
3/4 teas. salt
3/4 cup milk


Cut shortening into flour, baking powder, and salt until mixture resembles fine crumbs.  Stir in milk.  Drop dough by spoonfuls onto hot meat or vegetables in boiling stew (do not drop directly into liquid).  Cook uncovered 10 minutes Cover and cook 10 minutes longer.

Is that beautiful or what??

.
As my mom always says: "This'll cure what ails ya!"  (just kidding mom,  I'm in trouble now...)

This recipe also appears on Mandy's Recipe Box   ,The Recipe Critic
Not Just a Housewife, Chef in Training Link up parties! 

Monday, April 8, 2013

Sichuan Chicken with Cashews


     I think it about time for something kind of exotic don't you?  Every once in a while you just need to get out of your comfort zone and try something exciting.  I want to help you with that....Say to yourself, "I can do this."  It will be worth it, trust me.   When you eat this you may even need to play some Chinese music in the back ground and close your eyes and imagine that you are at an expensive restaurant.  It won't be hard  because this is really that good!

     I have tried to break it down to small steps because it is a little more involved than some recipes.  Not hard, just more to do.  You may even want to do the chopping the night or morning before if you are pressed for time before dinner.  The basic recipe comes from Betty Crocker's Sizzling Stir-Fries book but  I have made several changes.  Don't let the ingredients scare you.  I found them all at my local supermarket and this turns out with a little kick but you can easily control the ingredients to make it any level of heat you like. This recipe is quite mild.

First:


Chop green pepper into 3/4 inch pieces.  It is easier if you cut the sides of the pepper off the main part, then the seeds stay attached and  can be easily discarded.  

Slice the onion from top to bottom until you have 8 wedges. 

Drain the bamboo shoots and then cut into 1/2 inch pieces.
This could be done the night before if you like.


Cut the chicken breast into 3/4 inch cubes and put into a medium bowl.
This could be done a few hours before but make sure the chicken is never left out at room temperature for very long.  

If you are doing this ahead of time, you can cover the veggies and refrigerate and cover the raw chicken and refrigerate.

When you are ready to cook;

Mix together until blended in a small bowl or cup:  1 egg white
                                                                                     1 teas. cornstarch
                                                                                     1 teas. soy sauce
                                                                                      Dash of white pepper (opt.)
Take out chicken cubes and  stir in the egg white mixture then return to fridge for 20 minutes.


In another small bowl mix together:                          1 Tablespoon cornstarch
                                                                                     1 Tablespoon water
                                                                                     1 Tablespoon soy sauce

     Now this is the important part that will make this so much easier.  You will want to gather all your ingredients around the stove.  (Also gather any family members and/or loved ones that you want to impress with your astute knowledge of exotic cooking procedures so they can ooooh and ahhh with each addition.)
     You should have separately measured and ready: 

Chicken in bowl  with a separate plate to hold cooked chicken later
veggies
cornstarch mixture in a bowl
cashews and a plate with paper towel to drain them on
vegetable oil
ginger 
chicken broth 
chile paste in a measuring spoon
hoisin sauce and 
sweet chili sauce


     All in separate containers.  You should look like the test kitchen lady now with little bowls all around you ready to make this look like it is really cinchy to throw together!  


     It is much easier to make this when everything is close at hand.  The pan will be very hot so take care that nothing is too close but within easy reach.  Sadly, I do not own a wok so I just used my 12" non stick fry pan and it worked just fine. Also, you may notice that my ingredients are not all in separate bowls,  learn from my experience and it will be easier for you!
 
Now :
     Heat wok/pan until quite hot.  Add 2 Tblspn. oil and move pan around to coat bottom. 
     Add cashews: stir-fry 1 minute or until cashews are light brown.  Pour them onto the waiting paper toweled plate. 

     Add chicken to pan; stir-fry until chicken turns white and no pink remains inside. Remove chicken from pan to a waiting plate.
     Add 2 Tblspn. oil again to pan.  Add onion pieces, bell pepper, and ginger root/ginger.  Cook until onion and pepper are tender crisp then add chicken, bamboo shoots, sweet chili sauce, hoisin sauce and chile paste, stir-fry one minute.  Add broth; heat to boiling.  Stir in cornstarch mixture; cook and stir 20 seconds or until thickened. 
Stir in cashews and top with chopped green onion if desired. It is amazing, I promise!!


                                Just makes you want to get your chopsticks out doesn't it?


Sichuan Chicken with Cashews


1 1/2 lb boneless chicken breast
1 egg white
1 tsp cornstarch
1 tsp soy sauce
Dash of white pepper

1 large green bell pepper
1 med. onion
1 8 1/2 oz can sliced bamboo shoots, drained

1 Tblspn. cornstarch
1 Tblspn. cold water
1 Tblspn. soy sauce

4 Tblspns. vegetable oil, divided
1 cup cashews (I used canned salted cashews)

1 tsp. finely chopped gingeroot (I used 2 tsp. ground ginger)
4 Tblspn. hoisin sauce
6 Tblspn. Sweet Chili Sauce (for chicken)
1/4 to 1/2 tsp. chile paste ( I used a rounded 1/4 tsp.)
1/4 cup chicken broth
chopped green onion for garnish (opt)


Heat wok/pan until quite hot.  Add 2 Tblspn. oil and tilt pan to coat bottom. 
     Add cashews: stir-fry 1 minute or until cashews are light brown.  Pour them onto the waiting paper toweled plate.
      Add chicken to pan; stir-fry until chicken turns white and no pink remains inside. Remove chicken from pan to a waiting plate.
     Add 2 Tblspn. oil again to pan.  Add onion pieces, bell pepper, and ginger root/ginger.      Cook until onion and pepper are tender crisp then add chicken, bamboo shoots, sweet chili sauce, hoisin sauce and chile paste, stir-fry one minute.  Add broth; heat to boiling.  Stir in cornstarch mixture; cook and stir 20 seconds or until thickened.  
Stir in cashews and top with chopped green onion if desired

This recipe was linked to Totally Tasty Tuesdays with Mandy's Recipe Box ,
Kitchen Meets Girl, and lil luna

Monday, April 1, 2013

Italian Enchiladas! No kidding!


 Ragu Enchiladas

      Not long ago there was a car commercial on TV that made a joke about selling Italian tacos.  It sounds like a strange combination doesn't it?  I kind of laughed until I realized that one of my families favorite meals from their growing up years (that I created myself!) is Ragu Enchiladas!!!  It may sound unlikely but these enchiladas are a staple around my house.  My son even makes them now that he lives away at college and loves, loves them!  It has been kind of a secret family recipe for years.  But since we are such good friends I will share them with you.  Don't blame me if your kids ask for them for their birthday dinner.  

     One important thing to remember when you buy ingredients is that the sauce does matter.  I did fall into the trap of buying store brand sauces for a better price.  I suddenly didn't like these anymore and couldn't figure out why.  Even different flavors of Ragu make a difference.  I try to buy the tomato, garlic and onion flavor.  It just has the right flavor.  Others are good too and you can try them out at your own risk!
So start with Ragu, sour cream, 1 to 1 1/2 lbs cooked ground beef, grated cheddar cheese, and 10 enchilada size tortillas.


 Lay the shells out separately on a clean counter.  Divide the meat between the 10 enchilada shells.  Add small dollops of sour cream on top of the meat.


                                                                                              Then sprinkle with cheddar cheese.


 Roll up and place in a 9 x 13 pan.  I put 8 and then 
place the last 2 lengthwise on the edge of the pan.


 Pour Ragu sauce in a 4 cup measuring cup and then add about 1/2-3/4 cup water to the bottle and shake to combine with the sauce t                                                 that didn't pour out. I use about 3/4 cup but you may like it thicker). 
                                                  Pour this into the measuring cup and stir to thin the sauce a little.


                                                                                  Pour Ragu sauce on top to cover.                                                                        


Use a knife to pull the dry shell away from the side and fill with sauce.


 Sprinkle liberally with cheese
Then cover and cook at 350 degrees for 30 min. in the oven or cover with plastic wrap and microwave for 7 to 10 min on high until middle is hot and sauce is bubbly.


Then because it is usually just the two of us for dinner, I wrap some up and freeze them to send back to college for my son. 
Enjoy!
You saw this Ragu Enchiladas recipe first on Scrumptilicious 4 You! 
This was linked to Buns in my oven. and Kitchen meets girl,High Hills and Grills,lil luna
Mandy's Recipe Box