Showing posts with label Main dish. Show all posts

Tuesday, April 21, 2015

Italian Style Pork Chops

Buttery, Crispy, Baked Pork Chops your family will love!
I have tried many, many pork chop recipes and very few reach the level of flavor these Italian Pork Chops have.  They are baked with a crispy, buttery crust that leaves you wanting more!  Very easy to make and only 30 minutes in the oven and you are ready to eat!  Please try these and let me know if you love them!  

Prepare the breading mix by crushing crackers:

 Mix together with Parmesan cheese and spices:
 Set up an assembly line:
 Dip meat in butter, letting as much as possible run back into the bowl:
 Dredge in cracker crumb mix:
 Place in pan:
 Bake at 425 Degrees F for 30 to 40 minutes.


Add some side dishes and you have an amazing meal!
Tip:   I like to make up a double recipe and put 1/2 in a zip lock bag in the fridge for future use!  When I am in a rush this will save a lot of time!
 Shared with these great sites!

One Tispy Chick 
Sits Girls 
The Country Cook 
Inspire Me Monday 
A Pinch of Joy 
Pint Sized Baker 
Memories by the Mile
Lou Lou Girls  

Italian Style Pork Chops
Buttery, Crispy Baked Pork Chops
by Scrumptilicious 4 You!
Prep Time: 20 minutes
Cook Time: 30 minutes
Keywords: bake entree Italian
Ingredients (serves 5)
  • 1 cup crushed saltine crackers (about 18 crackers)
  • 1/2 cup grated Parmesan Cheese (I use the kind you shake from a bottle)
  • 1/4 teaspoon garlic powder
  • 1 teaspoon Italian-style seasoning
  • 5 Tablespoons butter
  • 5 Bone-in pork chops
Instructions
Preheat oven to 425 degrees F
In a medium bowl, combine the crushed saltines, cheese, and seasonings.
Set up an assembly line of meat, then melted butter in a bowl, then crackers, and finally a 13 x 9 pan to set the coated meat in.
Dip the meat in butter and then dredge in the cracker crumbs. Place in dish.
Bake at 425 F for 30 to 40 minutes taking care to check often with a meat thermometer until meat reaches 160 F degrees. Do not overcook!
Powered by Recipage

Wednesday, April 8, 2015

Cheesy Enchilada Casserole

Easy family meals
This enchilada casserole is so flavorful and fun!  Your whole family will love it and it is easy to make!

                         ----------------------------------------------------------------------------------

Cheesy Enchilada Casserole

1 pound hamburger
1 large onion (chopped), minced onion or powdered onion may be substituted
2 1/2 cups salsa (Use the level of heat you like, I used La Victoria chunky, medium)
1 (15 oz) can black beans rinsed and drained
1/4 cup Italian salad dressing
2 Tablespoons Taco Seasoning (I recommend Taco Bell Seasoning)
1/4 teaspoon ground cumin
3 or 4 flour tortillas, 10 inch or the size of your pan
1  15 oz can of corn, drained
3/4 cup sour cream (reduced fat may be used)
2 cups shredded Mexican cheese blend


Brown beef and onions in a large frying pan and drain.


  Stir in the salsa, beans, corn, dressing, sour cream, taco seasoning and cumin.  Layer 1/3  of the beef mixture in the bottom of a 2 quart baking pan.  Sprinkle 1/3 of the grated cheese on top.
 Place 1 1/2  of  the tortillas on top of the cheese and then repeat.
 The top layer will consist of the last 1/3 of your meat mixture and the last of your cheese.  Cover pan and bake at 400 degrees F for about 25 minutes or until hot and bubbly.  Serve with chopped tomatoes, lettuce, and cilantro if desired.
 
-----------------------------------------------------------------------------
Recipe Source:  Slightly adapted from Just Get off your Butt and Bake. 
Printer friendly recipe click here

This recipe has been shared with these wonderful sites!

Tuesday, March 11, 2014

Sour Cream Chicken Breast


Easy Sour Cream Chicken

     Sour Cream Chicken Breast is one of my most prized recipes!  My sister gave this to me many years ago and it still remains a favorite for family dinners, social dinners, and for company.  It is elegant yet simple to prepare.  I can't say enough about the flavor!  Juicy, perfect, and delicious  every time you make it!  

     One of the reasons why this is so tender and juicy is because it calls for bone-in chicken breast.  These tend to be quite large.  I try to buy the smallest piece I can but they still are pretty big.  If you cook it until it is tender and done, you can usually make a cut across the cooked chicken to divide it in half to make smaller portions.  This takes some practice to make it look good if it is for company to cut it in the right place where it will slide off the bone.  Just try one when you aren't worried about the looks of it and you will quickly learn where to cut.

Sour Cream Chicken Breast


Ingredients:


6-8 Bone in Chicken Breast (I used 4 in this recipe to fit into 1 13 x 9 pan)
1 Cup Sour Cream
2 Tablespoons Lemon Juice
1 Teaspoon Salt
1/2 Teaspoon Season Salt
1/4 Teaspoon Paprika
1/8 Teaspoon Garlic Salt

 Combine all ingredients except for the chicken in a large enough to dip the chicken breasts in.

Dip the chicken one at a time and place in a 13 x 9 pan.  Cover pan with plastic wrap and refrigerate at least 4 hours (or overnight).  


     When ready to cook uncover chicken and sprinkle with dried bread crumbs (about 3/4 cup). I make my own by putting a couple of slices of bread in a paper sack and leaving them to dry for about a week.
    When I need them I just take the bread out and crush with a meat mallet in a plastic bag.  I think this is much cheaper and easier than buying them at the store and I always have some on hand this way.  

     Now take between 2 to 4 Tablespoons butter and melt it in a cup in the microwave.  Drizzle the chicken with it. 
Cover the pan completely with foil and place in the oven.
   Cook at 325 Degrees for 1 and 1/2 hours.  If you want the chicken to brown, remove the foil the last 1/2 hour of cooking time. 

  This is gonna taste great!


 This recipe was shared on these wonderful sites!
Totally Tasty Tuesdays 
Whimsy Wednesdays 
Wake up Wednesdays 
Whats Cooking Love? 
Buns In My Oven 
Plucky's Second Thought 
Ladies Only Blog Share 
The Better Baker 
Hungry Harps 
Inspire Me Monday 

Wednesday, March 5, 2014

Mandarin Orange Chicken


I love recipes that you can cook in just a few minutes in the microwave.  This recipe is delicious and only takes 11 to 15 minutes to cook!!  Unbelievable?  No.  This is made with simple ingredients and prep time is short also.  It is a tempting dish to serve to company and won't heat up your kitchen on hot summer days.  Wonderful flavor!  
Microwave Chicken

15 minute Mandarin Orange Chicken

4-6 boneless chicken breast pieces (1 -1 1/2 lbs chicken) 
2 Tablespoons Brown Sugar
2 Tablespoons Cornstarch
1/2 cup Teriyaki Sauce
1/4 cup Apple Juice
1 Tablespoon Vegetable Oil
1 Garlic clove (Minced)
1 can (11 oz.) Mandarin Oranges
Hot Cooked Rice
2 Green Onions (chopped)


In a small bowl combine the brown sugar and cornstarch. Then mix in the next 4 ingredients.  Open the can of mandarin oranges and drain the juice into the sugar mixture. If your chicken breasts are thick, pound them with a mallet until they are about 1/2 inch thick, then put them in a 13 x 9 microwavable dish. 
Pour the juice mixture over the top of the chicken and cover it with plastic wrap.   Microwave on high for 8 minutes.  Carefully pull back the plastic wrap, watching that the steam doesn't burn you  and turn the chicken pieces over in the dish to coat them with sauce.  Reposition the plastic wrap and cook 3-5 minutes longer until sauce is thickened.  Sprinkle onions and oranges over the top to garnish.
Serve over hot rice
Yield 4-6 Servings

This recipe was shared with these wonderful sites!
Get Him Fed 
The Country Cook 
Inspire Me Monday 
Pint Size Baker 
Treasure Box Tuesday 
Tasty Tuesdays 

Monday, November 4, 2013

Deep Fried Halibut

deep fried halibut
      As a child I remember my parents going to a wonderful fresh fish restaurant to buy the freshest, most delicious fillet of halibut available in our western city.  The restaurant was called Bratten's  and it isn't around anymore but I still love to buy halibut and deep fry it the way Mom and Dad did years ago.

    Halibut isn't cheap and it is good to wait until it is in season.  I think that time is in the spring.  My local market had some on sale a couple of weeks ago and I jumped at the chance to buy some.  One thing to remember is that it doesn't take as much to make a good size serving as you might think.  Because the fillets are cut into a lot of pieces, one pound of fish made a very good size dinner for 3 adults.  

     Here is the recipe, if you like a sweeter batter you can play around the sugar proportion but this is a delicious batter as it is.

Halibut Fish Batter
 
1 cup flour
1 egg
1 Tablespoon sugar
1 teaspoon salt
1 cup milk
2 teaspoons baking powder

     Mix all ingredients together with a wisk in a bowl until smooth.

Cut fish into desired size.  I like mine about 1 inch x 2 inches.  It is easier and faster to cook if they aren't thick.  You can cut them in larger pieces but make sure they are cooked all the way through.  Keep size uniform so you can time and check the first few to make sure the meat is flakey all the way to the center.  Then use the same time for the same size pieces. 
cooking halibut
 Dip pieces in batter and fry in oil at 400 degrees until center is done.

deep fried halibut

fried fish


     These are very good dipped in lemon butter sauce.  Melt 1/2 cup butter in a small pan and add about 3 Tablespoons lemon juice.  Serve in small individual bowl for dipping.  

     These are not low in calories and we don't make them often but they are so delicious you will dream about them!

This recipe was shared on these sites.

Monday, October 28, 2013

Chicken Pot Pie

Chicken Pot Pie and Pastry
     This is the most amazing recipe for Chicken Pot Pie ever!  The No Fear, Easy Pie crust found here   just melts in your mouth and the filling is seasoned to perfection!  

     I first saw this in Paula Deen's cookbook and really loved it but I made a few changes to get it to the consistency I wanted.  It is made with some convenience foods and some fresh so it minimizes the time needed to prepare it.  To make it easier you can make the pie dough (this is made in a mixer and it sooo way easy!)  the day before and put it in the fridge.  

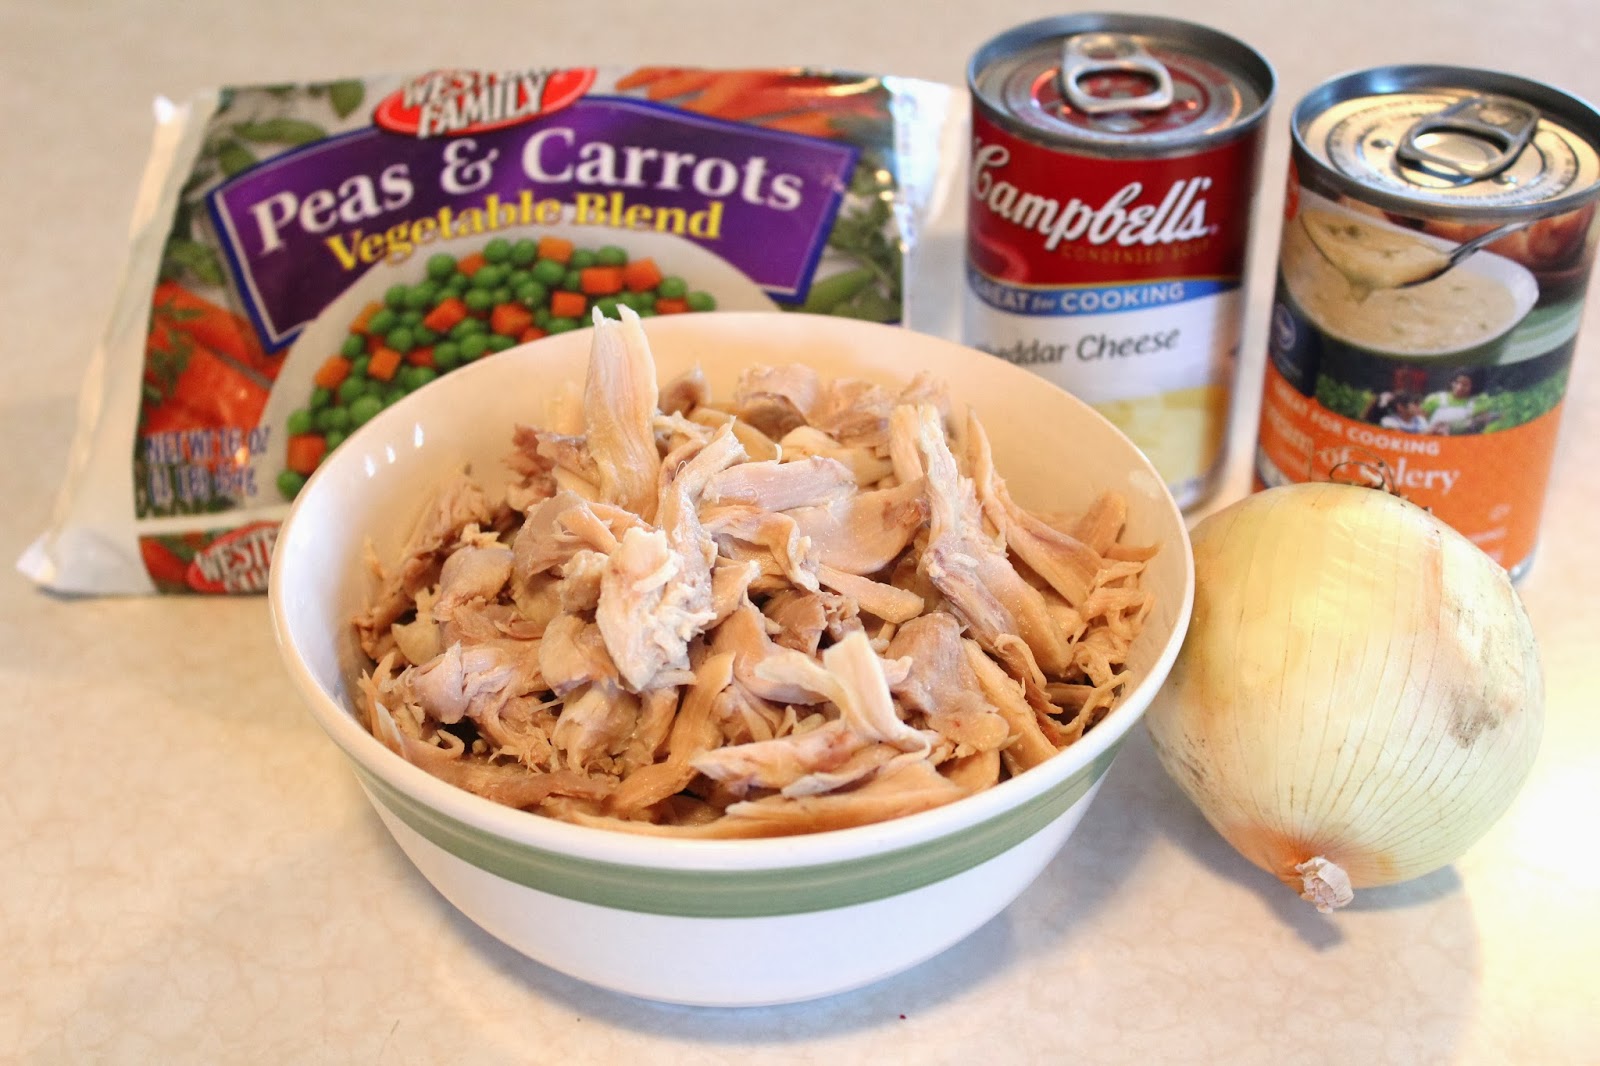
     Be sure to have some cooked chicken on hand either from a rotisserie chicken or baked chicken.  (I buy 10 lb. bags of chicken legs and thighs and boil it and then take it off the bone.  Then put it in 2 cup portions in a ziplock bag and freeze them.)  This comes in very handy for a recipe like this when you want to grab a bag and be ready to cook.

     I purchased a Wilton Jumbo Muffin Pan.  This one has 6 cups and is larger in size for a individual dinner portion like this.  I have made this recipe in a regular muffin pan and a 13 x 9 pan.  I found that I wanted to make the recipe with more juice in the individual cups because they have a greater proportion of crust in them than a square cut from a 13 x 9 pan.  If you change to the 13  X 9 pan size you might want to add more veggies or even some diced cooked potatoes to give more volume to the filling.

Here is this amazingly good recipe!

Chicken Pot Pie


1 10.5 oz. can Cheddar Cheese Soup (condensed)
1 10.5 oz. can Cream of Celery Soup (condensed)
3/4 cup milk
4 cups cooked deboned chicken
1 medium onion, diced
12 oz. frozen mixed green peas and carrots 
1/2 teaspoon salt
1/2 teaspoon pepper 

     Preheat oven to 350 degrees F.


 In a medium pan add diced onion and cover with water.


Boil onion for about 5 minutes until tender.  Drain water and add the remainder of the ingredients.  Stir often until mixture is hot.  Remove from heat.


Pastry


     Roll out No Fear, Easy Pie Crust on a floured surface until it is about 1/8th inch thick or about the thickness of a pancake turner. 


 For the Wilton Jumbo Muffin Pan I use a round plastic large margarine lid (3 lb size)  to cut around for the bottom crust.  It is about 6 inches in diameter and I cut 1/2 inch wider around it with a butter knife. A 7 inch circle is just right so anything you want to use to help cut it is great.


       I used a 4.5 inch cottage cheese lid for the top crust.
If you want to do a lattice woven top, use a pizza cutter to cut the circle into strips and lay them on top of the filled muffin cup.  


 Use a 1/2 cup measuring cup to place filling in the jumbo muffin cup.  Place top crust on and place in 350 degree oven for 25 minutes.  Make 5 to 6 Jumbo Chicken Pot Pies. 


This recipe was shared on these great sites!
The Recipe Critic
Chef In Training
Pint Sized Baker
Anyonita's Nibbles
A Pinch of Joy
Wonderful At Home 
Kitchen Meets Girl 
A to Zebra Celebrations 
Whimsy Wednesday 
Buns in My Oven 
Happy Kids, Inc. 
What's Cooking Love? 
Made in a Day 
Anyonita's Nibbles 
The Country Cook 
The Wondering Brain 

Wednesday, October 9, 2013

Family Time! Part 2- What do your Kids Really Want for Dinner?

Part 2---

In part 1, we talked about the really important reasons why you would want to make family sit down dinners at home part of your life.  It really does give your kids more than just a healthy meal.  It can be life changing for all of you.  But how, you ask, can I possibly do that when we have so much going on and so many other "things" to do?  I hope this part 2 article will help you get some ideas to lesson the stress and give you some doable ways to begin. 

If you are anything like me and my family it seems like life gets busier with each passing year.  So to help you with that, I put together a couple of top ten lists of things to do that will help simplify cooking for a family.  Also, to help you see the effects that eating together can have.  List #1 was in the 1st part of  "What do your kids really want for dinner?". 

List #2 - 

       Plan what you make and make what you love!

      
          1. Right now, go get a pen and paper and write down as many 
              meals as you can that you like to make for your family.

          2. Each time you try something new ask your family to rate it.
              I tell mine that because this is a trial recipe, they can be
              completely honest.  I really want to know what they think. 
              (I brace myself for honest reactions!!)  Ask them to rate it on
              scale of 1-3.  1=dislike, 2=ok, will eat again, 3=great! loved it!

          3. Write their preferences on the recipe so you can remember who
              loves it and who just likes it etc.  Now add it to your list from #1!

          4. Rotate making each one's favorite meals.  Or if you make one 
              person's fav. main dish, make another person's fav. side dish.
              That way everyone is happy!
   
          5. I LOVE lists!  At the beginning of each month I try to sit down 
             for just one hour (as opposed to worrying about each and every
             day for the next 30 days! and write each day of the month down
             the side of a notebook page.  I include the date and day of week. 
             (That makes it easier to see special occasions or prior
             commitments and plan around them.)  

          6. Variety is the spice of life!
              It is surprising how many meals you forget to put in your
              rotation through the years.  I still have favorites from my
              college days that we still enjoy and are very easy and frugal.
  
              Use your list from #1 above to help you fill in a dinner
              meal for each day.  This way you get a lot of variety 
              because you aren't just getting to the end of the day and thinking
              "What's in the fridge we could have for dinner?"  

              Does this sound like too much work?  It becomes fast and easy 
              when you do it with a list of meals you have made but also;

                  1. You don't have to stress every night (or all day long) over
                      what to have for dinner.  It is all thought out! NO Stress!

                  2. If you aren't in the mood for the meal plan for the night
                      no problem!  Switch!  Because you have planned to have
                      all the ingredients for so many meals at the first of the 
                      month, you can easily look at your list and just Switch!

                  3. Shopping is much more effective and easy because you
                      have a plan and a list!  You save money because you 
                      don't have to make a store run and end up picking up
                      extra impulse buys.  As you fill in your dinner schedule, 
                      make a line down the page for another column to list
                      any ingredients you don't have on hand.

            7. Make Doable Meals!  Be kind to yourself.  As you schedule 
                your month, fill in busy days with meals that are simple to 
                prepare.  Have a freezer meal that just needs to thaw in the
                microwave or pull out some salmon, thaw it, sprinkle with
                seasoning and bake for 10 min. with a green salad, dinner is
                ready!  Don't over schedule yourself!

            8.  Get a good freezer and use it!!  I know a few women (working
                and not), who spend a couple of complete Saturdays a month
                making freezer meals so they don't have to cook when they
                get home each evening.
  
                That is great for those that it works for and I applaud them,
                but it doesn't work for me.  I can't remember a time
                even now that my children are gone that I felt ambitious
                enough or had a whole days time to devote to making
                meals.  

                Much easier for me was to double or even triple meals
                as I make them.  I was already getting all the ingredients
                out, mixing and cooking them so it just didn't take much
                longer to make an extra recipe and freeze it.  Even now that                         it is just my husband and I most of the time, I haven't lost
                the desire to cook nice meals because I know that my efforts 
                tonight mean that I get a night or two off in the future and it
                it so great to have 2 or 3 nights off a week that way!

            9. Get the kids to pick meals they can learn to make and be in
                charge of!   Here is a link to a great recipe that even young
                children can help with.  Bubble Up Pizza by The Country Cook.
                Another fun recipe kids really love is found on my site, 
                Ragu Enchiladas, and they could help with these also.
               
     This is where I hope you won't judge me but I only have 9 in my top ten list..but I hope these ideas are as valuable to you as they have been to me!
The important message here is that eating together as a family is invaluable.  It sets the stage for more open communication and creates the feeling that being together is important and that we like each other!  

     If all these ideas don't work for you please feel free to pick the ones that do and then improvise your own!  You will soon learn that what your kids really want for dinner is...
                                           YOU!


I would love to hear any ideas you have that would help others with busy lives find ways to have sit down meals together!  I love your comments!


This has been shared on these wonderful sites!  
Mandy'a Recipe Box
Buns in my Oven
Anyonita's Nibbles
What's cooking Love?
The Country Cook